本节课一起动手实践 Hello World 内核模块,逐步剖析驱动程序的开发过程,从而掌握 Linux 驱动的基本知识。
上一节回顾
在 RustForLinux:跟着清华训练营从零打造 Linux 驱动【第一课】中,主要讲解了如何配置 Rust for Linux 驱动环境。不知道各位同学在配置过程中是否顺利呢?如有任何问题,欢迎在后台私信留言与我交流。我将竭诚为您解答,本节课将一起探究如何从零开始编写一个 Hello World 驱动。让我们一起动手实践,逐步剖析驱动程序的开发过程,从而掌握 Linux 驱动的基本知识。
module! { type: RustHelloWorld, name: "rust_helloworld", author: "Rust for Linux Contributors", description: "hello world module in rust", license: "GPL", }
structRustHelloWorld;
implkernel::Module forRustHelloWorld { fninit(_module: &'static ThisModule) ->Result<Self> { pr_info!("Hello World from Rust module (init)\n"); Ok(RustHelloWorld) } }
implDropforRustHelloWorld { fndrop(&mutself) { pr_info!("Hello World from Rust module (exit)\n"); } }
现在,可以使用 make menuconfig 命令配置内核,并使用 make build 命令编译包含 rust_helloworld 模块的内核。编译完成后,将 rust_helloworld 加载到内核,将会看到 Hello World from Rust module (init) 的输出信息,同时,可用 lsmod 命令进一步验证模块加载是否成功。
1
2
3
4
5
6
7
8
9
10
11
12
13
14
## 加载成功示例

# 加载模块
(kernel) >insmod rust_helloworld.ko
[   14.939902] rust_helloworld: loading out-of-tree module taints kernel.
[   14.948683] rust_helloworld: Hello World from Rust module (init)

# 显示已加载哪些模块
(kernel) > lsmod
rust_helloworld 12288 0 - Live 0xffffb891261ea000 (O)

# 卸载模块
(kernel) >rmmod rust_helloworld
[   30.893186] rust_helloworld: Hello World from Rust module (exit)
/// Declares a kernel module. /// /// The `type` argument should be a type which implements the [`Module`] trait. /// Also accepts various forms of kernel metadata. /// /// # Supported argument types /// - `type`: type which implements the [`Module`] trait (required). /// - `name`: byte array of the name of the kernel module (required). /// - `author`: byte array of the author of the kernel module. /// - `description`: byte array of the description of the kernel module. /// - `license`: byte array of the license of the kernel module (required). /// - `alias`: byte array of alias name of the kernel module. #[proc_macro] pubfnmodule(ts: TokenStream) -> TokenStream { module::module(ts) }
module 函数对各个参数进行解析,然后,使用 format! 宏返回一串字符串。这串字符串是在 Rust 中实现 Linux 内核 C 模块所需的大量定义。在其中,同样生成了 C 代码中实现模块所必需的入口函数、出口函数等一系列内容,并通过 Foreign Function Interface(FFI)形式最终调用了 C 模块的代码。
// Built-in modules also export the `file` modinfo string. letfile = std::env::var("RUST_MODFILE").expect("Unable to fetch RUST_MODFILE environmental variable"); modinfo.emit_only_builtin("file", &file);
format!( " /// The module name. /// /// Used by the printing macros, e.g. [`info!`]. const __LOG_PREFIX: &[u8] = b\"{name}\\0\"; /// The \"Rust loadable module\" mark. // // This may be best done another way later on, e.g. as a new modinfo // key or a new section. For the moment, keep it simple. #[cfg(MODULE)] #[doc(hidden)] #[used] static __IS_RUST_MODULE: () = (); static mut __MOD: Option<{type_}> = None; // SAFETY: `__this_module` is constructed by the kernel at load time and will not be // freed until the module is unloaded. #[cfg(MODULE)] static THIS_MODULE: kernel::ThisModule = unsafe {{ kernel::ThisModule::from_ptr(&kernel::bindings::__this_module as *const _ as *mut _) }}; #[cfg(not(MODULE))] static THIS_MODULE: kernel::ThisModule = unsafe {{ kernel::ThisModule::from_ptr(core::ptr::null_mut()) }}; // Loadable modules need to export the `{{init,cleanup}}_module` identifiers. #[cfg(MODULE)] #[doc(hidden)] #[no_mangle] pub extern \"C\" fn init_module() -> core::ffi::c_int {{ __init() }} #[cfg(MODULE)] #[doc(hidden)] #[no_mangle] pub extern \"C\" fn cleanup_module() {{ __exit() }} // Built-in modules are initialized through an initcall pointer // and the identifiers need to be unique. #[cfg(not(MODULE))] #[cfg(not(CONFIG_HAVE_ARCH_PREL32_RELOCATIONS))] #[doc(hidden)] #[link_section = \"{initcall_section}\"] #[used] pub static __{name}_initcall: extern \"C\" fn() -> core::ffi::c_int = __{name}_init; #[cfg(not(MODULE))] #[cfg(CONFIG_HAVE_ARCH_PREL32_RELOCATIONS)] core::arch::global_asm!( r#\".section \"{initcall_section}\", \"a\" __{name}_initcall: .long __{name}_init - . .previous \"# ); #[cfg(not(MODULE))] #[doc(hidden)] #[no_mangle] pub extern \"C\" fn __{name}_init() -> core::ffi::c_int {{ __init() }} #[cfg(not(MODULE))] #[doc(hidden)] #[no_mangle] pub extern \"C\" fn __{name}_exit() {{ __exit() }} fn __init() -> core::ffi::c_int {{ match <{type_} as kernel::Module>::init(&THIS_MODULE) {{ Ok(m) => {{ unsafe {{ __MOD = Some(m); }} return 0; }} Err(e) => {{ return e.to_errno(); }} }} }} fn __exit() {{ unsafe {{ // Invokes `drop()` on `__MOD`, which should be used for cleanup. __MOD = None; }} }} {modinfo} ", type_ = info.type_, name = info.name, modinfo = modinfo.buffer, initcall_section = ".initcall6.init" ) .parse() .expect("Error parsing formatted string into token stream.") }
在阅读生成的代码时,发现了一个 #[no_mangle] 属性,该属性用于关闭 Rust 的名称修改。Rust 编译器在编译过程中会修改我们定义的名称以进行某些分析。然而,如果直接将这些名称用于 C 语言,可能会导致符号名称不匹配。通过使用 #[no_mangle] 属性,可以确保名称的一致性。
总结:在 Rust for Linux 中声明一个模块时,尽管外部看起来平静如水,但实际上 Rust for Linux 正在负重前行。
深入了解 Bindings 机制的必备知识
Bindings 机制解读
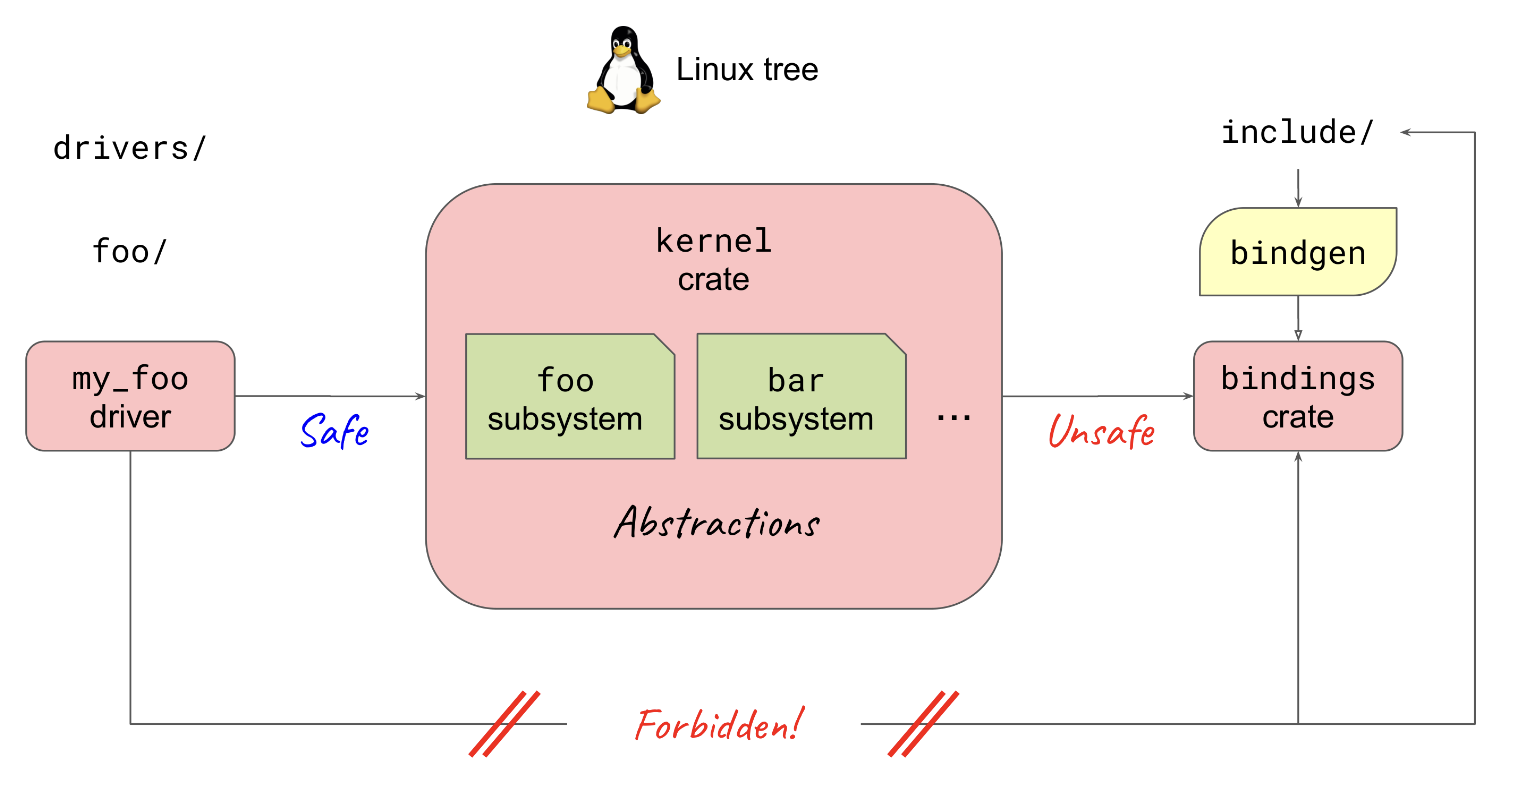
Rust for Linux 针对部分关键内核框架提供了封装和抽象。这些抽象基于 bindings 和 helper 对 Linux 内核接口进行了封装。通过直接调用 bindings 和 helper,可以实现对 Linux 内核接口的访问。
值得关注的是,在 Linux 内核所提供的众多内核接口中,大部分尚未被 Rust for Linux 封装。因此,如需直接调用 Linux 内核中的接口,可直接调用 bindings 和 helper。
Bindings 使用方式
在 Linux 中,通过头文件方式提供的接口可以在 /rust/kernel/bindings_helper.h 文件中直接添加相应的头文件。例如: